A person might think—had they, say, never met me—that after the saga of the cupcake stands I might have, I don’t know, learned my lesson about “simple” DIY projects. In the end, did I really save any money? (Maybe just a little.) Did I really save any money if we put even the bare minimum value on my time as a factor? (Definitely not.) Was the hassle worth the outcome? (Ask me after the wedding, I guess.) Did I learn that making things myself is always going to take more materials, time, and know-how than I probably have on hand? (Listen, I am starting to feel personally attacked, and I would appreciate it if you would just go back to admiring the stands because they came out great, and let’s just not discuss it.) Tl;dr: No, I learned nothing. NOTHING.
The cupcake stands were completed just in time for me to work on the centerpieces, which I had (of course) figured I could make cheaply/easily and to the exact specs the brides desire, and wouldn’t that make more sense than 1) real flowers (which are finicky, and die, and are expensive) or 2) renting from the venue (which is already costing us… uhhhh, I feel woozy, let’s not talk about it… and everydamnthing you might want other than a door and a floor costs extra)?
Sooooooo. Lemme tell you about the centerpieces. (Which aren’t even DONE.)
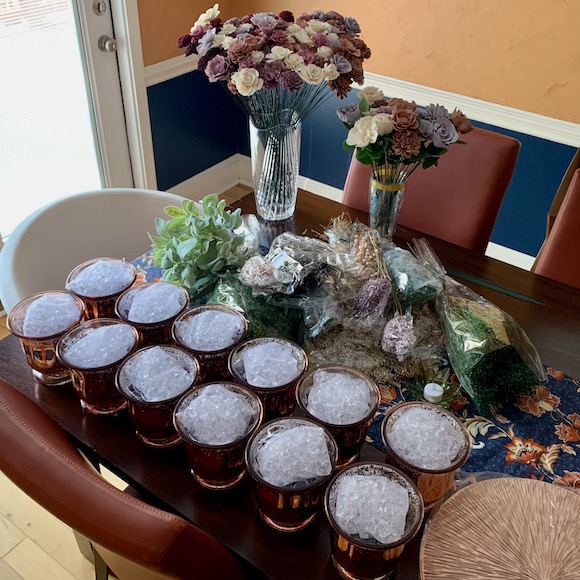
As already mentioned, I purchased a ton of wood flowers, and we had a flower dyeing party this summer, wherein we made them all Official Wedding Colors. A couple of weeks ago Sunny’s mom came over again with a couple of glue guns, and we spent a morning attaching the flowers to stems. It was at this point that I also went into Chickadee’s closet and pulled out every bag and box of “we can use these for centerpieces!” purchases I’d made, wherein I discovered that I’d easily accumulated twice as much “filler” greenery as flowers. This turns out to be a good thing, I think, because what had seemed like a CRAZY amount of wood flowers during dyeing and stem-attaching turns out to look like not that many flowers, really, once it’s all done and you realize you have 12 vases to fill.
The original plan had been to do the arranging that same day, but Sunny’s mom had to go when we finished gluing. No matter! We still have loads of time, and we could reconvene to finish the arrangements another time.
This is where things went just a little bit sideways. SURPRISE! Turns out, it was a good thing we didn’t try to make the arrangements that day.
I had ordered what I thought was an ample quantity of clear acrylic “rocks” from one of those “these super cheap items were definitely not made by orphans in sweatshops, swearsies” websites you should never use, and so I shouldn’t have been surprised when said bag of rocks arrived and was about… oh, maybe a cup and a half worth. Not enough to fill all the vases, obviously.
So then I went on Amazon and ordered a 5-pound bag of clear acrylic rocks, and it arrived and was more like what I’d expected when I’d placed the first order. Yes, good! So one day, post-gluing, I figured I’d go ahead and prep the vases so they’d be ready when it was time to arrange. I took out all the vases and lined them up on the dining room table and started filling them with said rocks. I opened bag after bag, deposited handful after handful, and when all the rocks were used up… each vase was about 1/4 of the way full.
The vases are not that big, y’all. It was like every darling rose gold mercury glass vase turned into Mary Poppins’ carpet bag and just swallowed up those rocks faster than I could dole them out.
At this point, a sane person would’ve probably ordered 15 more pounds of acrylic rocks, but we already know that 1) I’m not sane and 2) I am cheap. I got a decent deal on the rocks, true, but generally speaking, they’re not inexpensive. The amount I’d need to actually FILL the vases was going to make it costly. Surely there was a better way…?
After extensive research, I ordered some chunks of floral foam. I was quite pleased with myself. Because floral foam:
1) is much cheaper than acrylic rocks,
2) is lighter than acrylic rocks (and I want the centerpieces to be heavy enough to prevent toppling, but not so heavy that transporting them is a nightmare),
3) is actually the “proper” way to anchor the greenery so that things stay put,
and
4) with a big chunk of floral foam hidden inside the rocks, maybe I had enough rocks?
The foam arrived and I calculated the sizes I would need, except I am SO SO BAD AT MATH, imagine how astonished I was to discover that if you only have 1/4 vase worth of rocks, a chunk of floral foam is in no way going to make that enough rocks to surround the foam and fill the vase.
I tried different configurations and quickly concluded this was a fool’s errand. But I was still reluctant to buy more acrylic rocks. Because reasons.
Somewhere in here I discovered that the same people who sell the cool-looking acrylic rocks also sell… acrylic ice cubes! As I was looking for volume over weight, and the ice cubes were—volumetrically speaking—cheaper than the rocks, instead of buying another 5 pounds of rocks, I bought 2 pounds of cubes, for slightly less money. (Less overall, anyway. Less per pound? Hush, just let me tell my story.)
The cubes arrived and I divided the number of cubes by number of vases and set about figuring out how to configure such that each vase would be perfectly full, with the foam both hidden and well-anchored in the center.
Did I mention that these are mercury glass vases? As in, not opaque? And also that I had fairy lights to put inside each vase to create a glow, but the point of the acrylic rocks is to magnify said glow, and if the floral foam isn’t ENTIRELY COVERED it would turn any ethereal glow into “is something moldy in there?” or “um, are the aliens approaching?”
I still didn’t have enough to fill the vases, and even if I bought more rocks, I was learning that—WHO KNEW?—irregular rocks in a glass vessel will shift, and densely packing rocks around foam will destroy the foam, and my attempts to obscure the floral foam without said squashing were… not successful.
I’m a mature, capable adult, so I had a good cry and some ice cream, and decided to think on it some more.
The next day, I experienced the one, single flash of brilliance I can claim in this entire process. If I could rig some sort of plastic retainer inside the vases, one which would shield the foam from being squished, take up some room, and allow the rocks and cubes to be scattered around and on top of it, that would be the answer.
I love (and—more than that—adore) both girls, so I knew I had to figure out how to make this work. Which is how we arrived here, with my “cheap” (hahahahaaaaaa) and “easy” (HAHAHAHAHAAAAA) DIY centerpiece construction.
After some trial and error, I discovered that I actually already possessed 10 small plastic food containers which could be trimmed to be exactly the right size to stick in the vases and protect the foam.
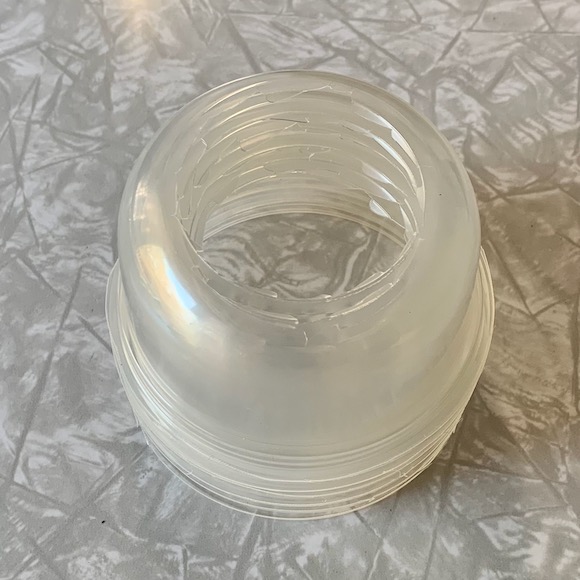
They look like Blizzard cup lids, right? But they used to be take-n-toss bowls I cut the lips off of and stabbed until I could cut out the bottoms.
[Sidebar: The stabbing was very therapeutic.]
“But Mir,” I can hear you saying, “You said you had 10 of those, and didn’t you say you had 12 vases?”
You are correct! Not pictured: Two square containers I completely butchered to make sort of work for the last two vases. Desperate times, desperate measures, etc.
So in the end, I figured out how to do this. Allow me to show you.
Step 1: Grab a vase. Take a deep breath.
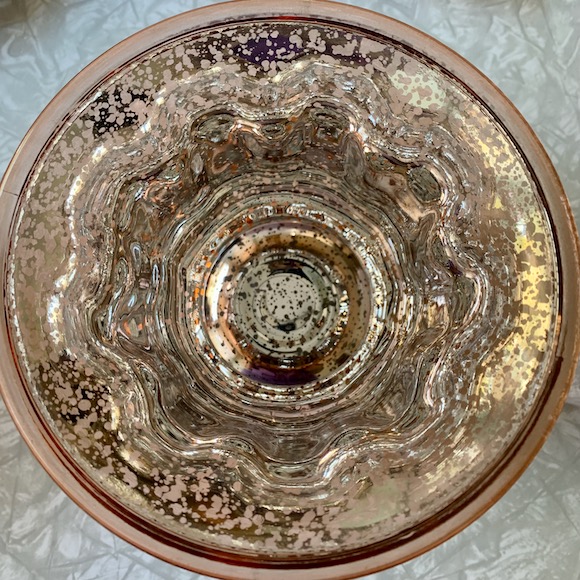
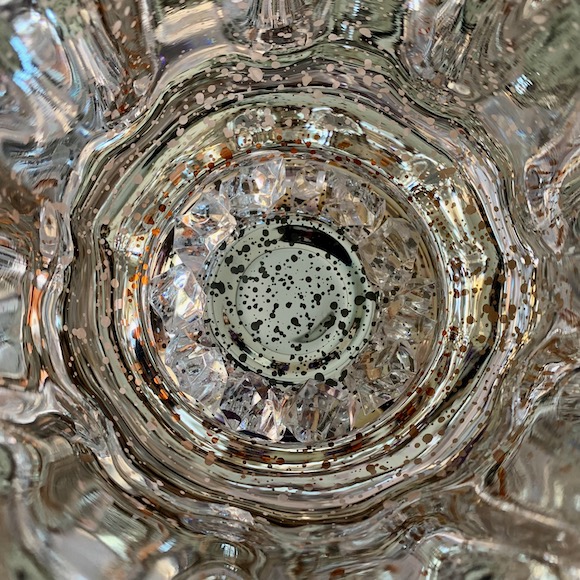
Step 2: Take 11 (yes, exactly 11) acrylic rocks and wedge them into the channel at the very bottom of the vase. This does two things: it tricks the eye into thinking the entire vase is filled with rocks (because the foot channel there is one of the few places that is super-seethrough) and it provides a platform for the floral foam, too.
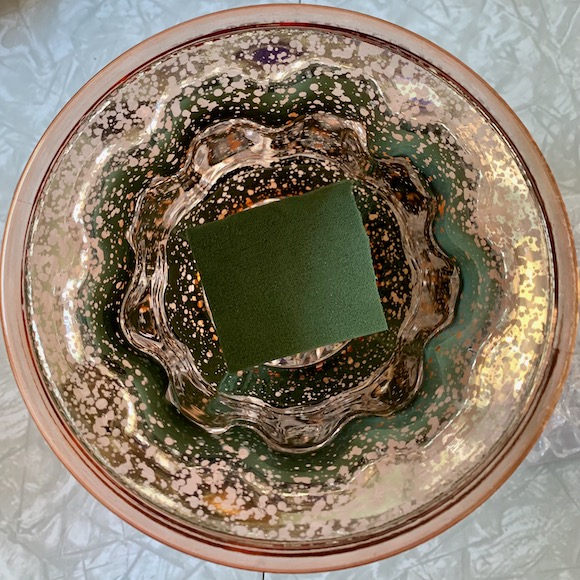
Step 3: Plunk your floral foam rectangle into the vase, on top of your rock ring.
Step 4: Grab a string of fairy lights. Undo the twist ties, remove the tab blocking the battery, turn them on to make sure they work. When they do, turn them off again and unwind the wire (which will take longer than you think, and will get tangled at least once, no matter how careful you are). Form the end of the string into a double ring the size of the vase, and carefully tuck said coil around the foam.
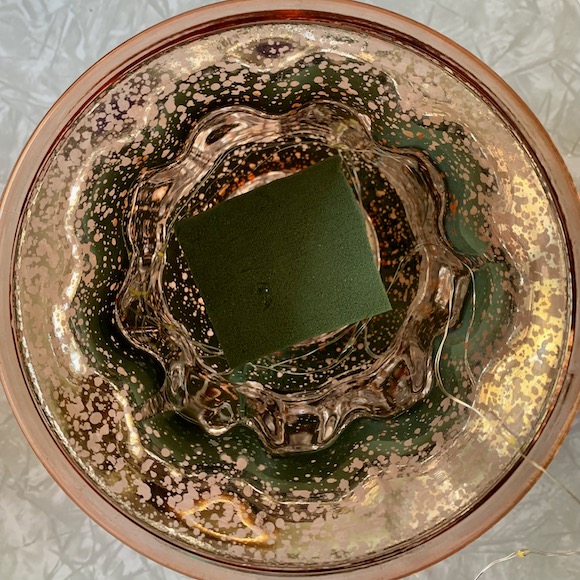
Step 5: Now it’s time to take one of those plastic shells and CAREFULLY stuff it down so that it is wedged into the vase, covering the foam and holding the first coils of wire in place.
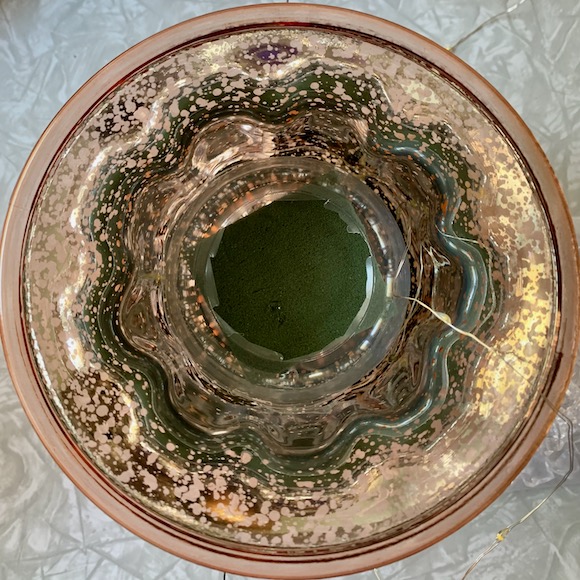
Step 6: Make two more coils with your fairy light strand, draping it down along the sides of the plastic retainer (the lip prevents the wire from going to the bottom). Once that’s done, grab 9 (YES, EXACTLY 9, I’M NOT TWITCHING, YOU’RE TWITCHING) acrylic rocks and carefully wedge one in every channel of the glass, against the plastic. This is holding the fairy light strand in place, giving more “full of rocks” illusion from the outside, AND—most important!—making sure that plastic retainer is not going to move, probably ever.
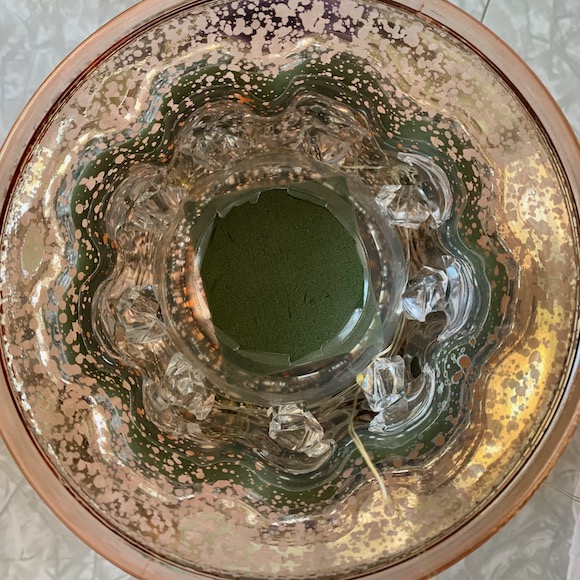
Step 7: Now it’s time for the ice cubes! They make a nice thick layer on top of the apparatus you just built, but can easily be moved out of the way when it’s time to start poking stems into the foam. Coil up the remainder of the fairy light wire to sit against the inner top of the vase, too.
Step 8: It is now quite late at night, and you have been working on these damn vases for who knows how long, and suddenly it occurs to you that maybe this doesn’t look as good as you think. Maybe you can still see the foam! MAYBE EVERYTHING IS ACTUALLY TERRIBLE!!!!!
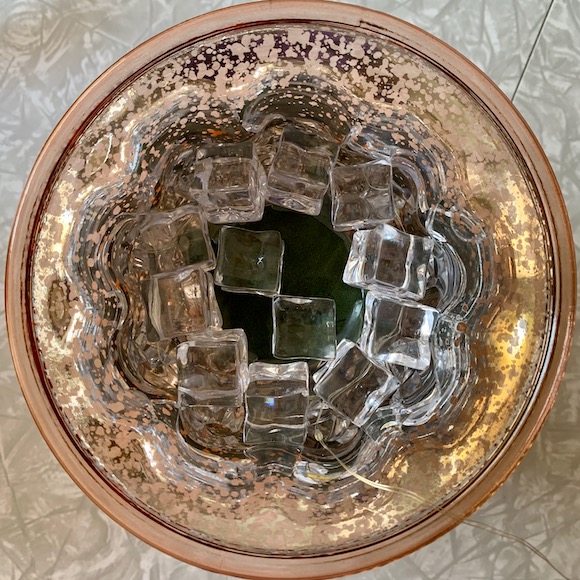
Test one out.
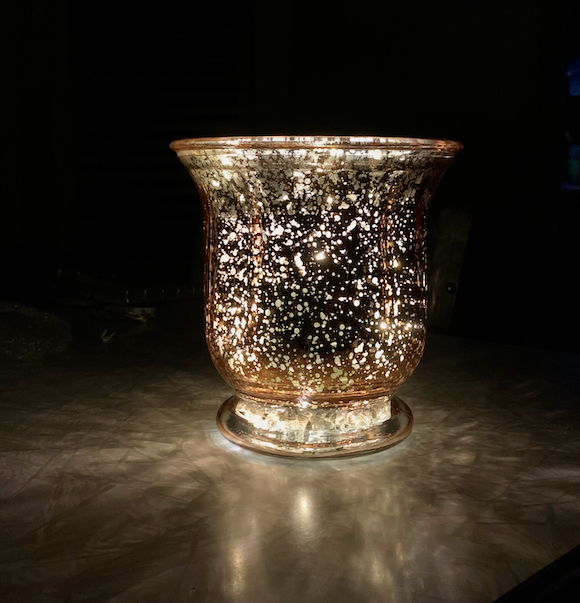
Step 9: Gather up the rest of the acrylic rocks—you know, the ones that only filled 1/4 of the vase, before, but which you’ve only used 20 of to this point—designated for that vase and stick them into a little bag on top. When it’s time to make the arrangements, you can remove the bag, do the flowers, then pour the remaining rocks on top (they will now completely fill to the rim, HALLELUJAHHHHHHHHH!) and nestle the fairy light switches into them.
Step 10: Profit!
We’ll be making the actual arrangements later this week, so, you know, I’m sure something could still go catastrophically wrong. Probably it will. But for right now, I’m feeling pretty okayish.
But, um, if someone could maybe stop me before I attempt to craft again…? I think I’d appreciate it.
Crafting project, much like plumbing projects, always require at least 3 trips to the store. ALWAYS.
And while the centerpiece (hehe) will be the happy couple, there will be at least one person who notices them, and corners you asking where you got them. Whereupon, you can glow a bit, puff out your chest, and casually say, “Actually I made them.” Remember crafting rule #1: if you don’t point out your mistakes, no one will notice them.
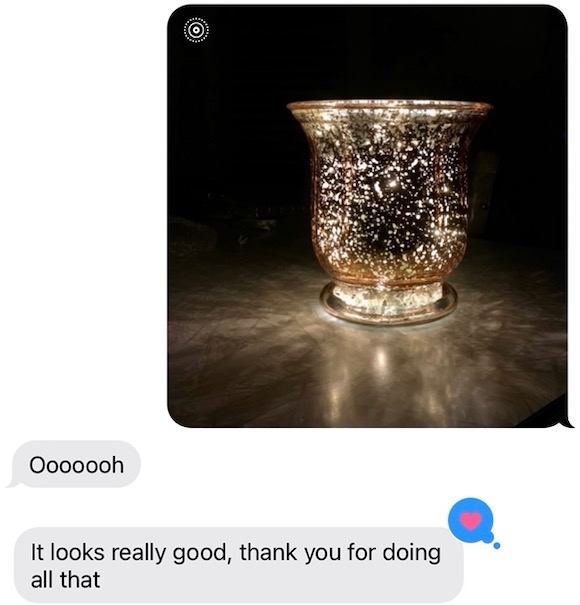
And I think they look gorgeous!
I am exhausted and out of breath just reading this. And incredibly surprised and relieved that the account contained no slicing of tendons or otherwise trips to an emergency room. Well done, you.
You’ve just given everyone an amazing tutorial should they ever need to do this! I feel similarly when I volunteer to do something. A friend tells me to sit on my hands!
You’re so pretty!
They’re so beautiful, Mir!!
I know that was a lot of problem-solving and work.
The result is just lovely.
Holy guacamole, those are stunning.
Mir:
love what you did with the rocks and the foam.
Wow! Your neurotic attention to detail yielded the absolutely most stunning beautifully gently lit vase… I’m so impressed! *deep sigh* your baby is getting MARRIED!
I resemble this remark, Meri. Good thing I love you. :)
It’s a labor of love and worth all the effort because you love those kids so much. This is the kind of project that I get frustrated with because I will finally get it all figured out only to realize that this is a project that I will never do again. I won’t have the opportunity to utilize the skills again, at least not before I forget every fool thing I learned. That said, it will still be worth it!
These are absolutely BEAUTIFUL, just like you, Mir.
Why am I literally on the edge of my seat reading this? And maybe screaming inside a little bit. The end result is beautiful, and I’m convinced that most “so easy and cheap!” DIY projects you see online are leaving out at least half of the instruction details. And the cost. And the screaming.
They are/will be beautiful! And there is no way on earth you could have purchased an equivalent finished product, so in that sense you are financially well ahead of the game.
Mir the vases are stunningly beautiful!! Just amazing! I have some artsy skills but definitely don’t have the crafting gene. I have no idea how you figured out how to make either the cake stands or these gorgeous vases. It’s going to be an amazing wedding!!